Vish G
October 22, 2026
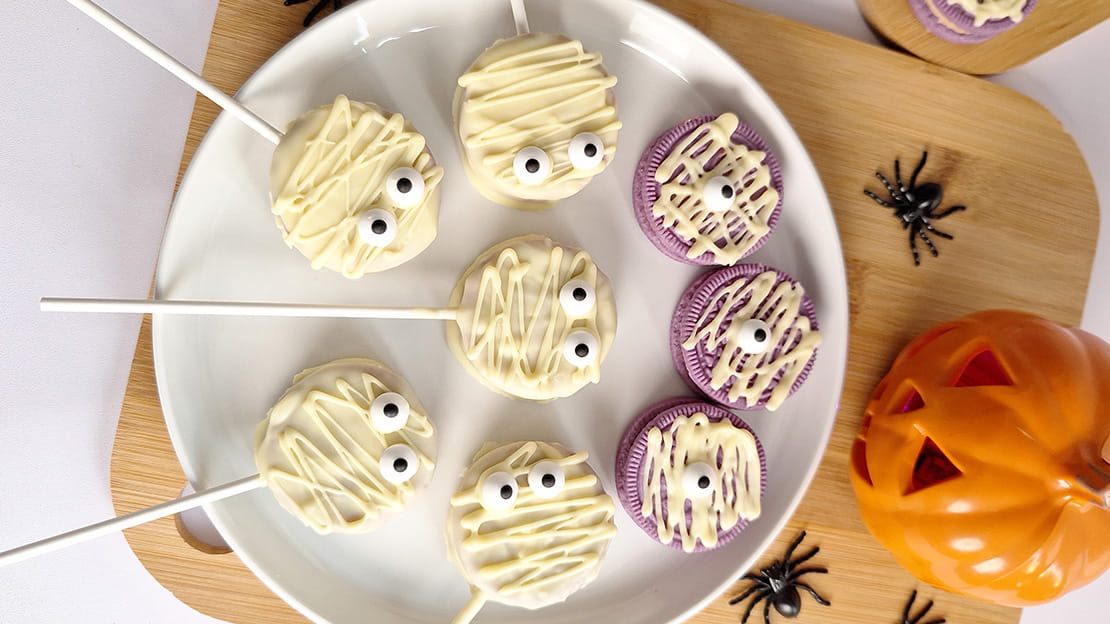
Halloween themed mummy Oreo cookies that are super easy to make without the fuss of cooking or baking. Just a few simple ingredients and you have a delicious biscuit coated with a cute design made from white chocolate with a hint of coconut to pair with it. Mummified with edible candy eyes to make them look extra spooky. Kids always love this recipe idea. Put them onto white lollipop sticks for an added touch that makes them look special.
Pairing Suggestions
PREP TIME
40 MIN
COOK TIME
0 MIN
SERVINGS
12
You can. White chocolate chips work well for Mummy Oreos although the results can vary depending on the brand. Some chips are designed to hold their shape when heated which means they may melt into a thicker mixture than a good quality white chocolate bar.
For the smoothest coating choose white chocolate that contains cocoa butter and chop it into small even pieces if using a bar. Melt it gently in the microwave, stirring every 15 to 20 seconds to prevent overheating. Add a teaspoon of virgin coconut oil to your 200 g of melted white chocolate to help it flow more easily and give it a lovely hint of coconut flavour.
If your chocolate is still too thick for dipping then try add a tiny amount of more coconut oil and stir well before adding any more.
The easiest method is to use a microwave at 50% power and heat the chocolate in short bursts. Place your chopped white chocolate in a completely dry microwave safe bowl and heat for 20 seconds before removing it and stirring thoroughly. Continue in 15 to 20 second bursts until the chocolate is nearly melted, then stir until the remaining pieces disappear.
White chocolate can burn surprisingly quickly so avoid heating it for too long at once. It's also important to keep water and steam away from the bowl as even a small amount of moisture can cause the chocolate to seize and turn thick or grainy. When we made ours we used a double boiler method but if you use this method then just ensure the bowl is not touching the water.
Once the chocolate is smooth stir in the coconut oil. If the mixture starts to thicken while you are dipping the Oreos, warm it for another 5 to 10 seconds and stir again. Gentle heating and frequent stirring are the secrets to a smooth glossy coating.
Coconut oil helps thin the melted white chocolate making it easier to dip the Oreos and create the decorative mummy stripes. It also adds a delicate coconut flavour that pairs beautifully with the sweet white chocolate and chocolate sandwich biscuits.
For this recipe start with 1 teaspoon of virgin coconut oil for 200 g of white chocolate. If the chocolate is still too thick to coat the cookies smoothly, add up to another half teaspoon a little at a time.
Be careful not to add too much though as excess coconut oil can leave the finished coating softer and more likely to melt in a warm room. For the best looking mummy stripes keep the drizzle slightly thicker than the dipping chocolate so the lines hold their shape instead of spreading across the biscuit.
The easiest way to make the mummy stripes is to use a small piping bag or a clean zip top food bag. Once the chocolate coating on your Oreos has set, melt a little more white chocolate if needed and allow it to cool slightly until it is smooth and easy to drizzle.
Transfer the chocolate to your bag and snip a tiny opening in one corner, around 1 to 2 mm wide. Practise a few lines on baking parchment first so you can check the flow.
Move your hand gently back and forth across each Oreo, creating thin zigzag lines at different angles. Leave small gaps between the stripes and keep the candy eyes visible. The lines do not need to be perfectly straight or evenly spaced. Slightly uneven bandages actually make the mummies look more realistic.
If the chocolate becomes too thick to pipe, warm it briefly and stir it well. If the lines spread too much, let the chocolate cool a little longer before continuing.
Absolutely! Oreo mummies are an excellent make ahead Halloween treat because they don't require baking and the chocolate coating helps protect the biscuits from the air too! Sweet right?
You can make them a day or two before your Halloween party. Allow the chocolate coating, mummy stripes and candy eyes to set completely then place the biscuits in an airtight container in a single layer.
Store them in a cool dry place away from sunlight and heat. If your kitchen is warm, keep them in the fridge instead. When taking refrigerated Oreos out to serve leave them inside their closed container while they gradually warm up. This helps reduce condensation on the chocolate keeping the finish smooth and aesthetic.
For the best texture and appearance I recommend making them the day before serving. That gives you plenty of time to prepare without leaving the decorating until the last minute.
The easiest and most reliable method is to use a tiny dab of melted white chocolate as edible glue. Once the chocolate coating on each Oreo has set put a small dot of melted white chocolate on the back of each candy eye and gently press it into place near the top of the cookie.
Hold each eye in position for a few seconds to help it stick. Then pipe the mummy stripes around the eyes leaving enough space so they remain clearly visible.
You can also attach the eyes while the freshly piped stripes are still slightly soft but we found that using a small dab of melted chocolate gives you more control over their position. Once all the decorations are in place just pop the biscuits to the fridge for another 10 to 15 minutes so everything sets firmly.
If you are making these with children, let them help position the eyes and create the bandages. The slightly wonky designs often turn out to be the cutest ones!
Nutrition Facts
Calories
190
Total Fats
11 g
Saturated Fats
6.5 g
Cholesterol
5 mg
Sodium
75 mg
Total Carbohydrates
21 g
Sugars
15 g
Protein
1.5 g




Search our tested recipe collection!
From weeknight staples to show stopping desserts, all tried and re-tested.
How Did It Turn Out?
4.5 / 5. Vote count: 64
No votes so far! Be the first to rate this post.